Chocolate-Covered Almond Clusters in 10 Minutes

Chocolate-covered almond clusters are one of those treats that manage to feel luxurious while requiring almost no effort. The combination of roasted almonds wrapped in smooth, glossy chocolate is timeless, crunchy, rich, and satisfying in all the right ways. The beauty of this recipe lies in its simplicity. With just a handful of ingredients and ten minutes of active time, you can create something that tastes like it came straight from a gourmet chocolatier.
Why Chocolate and Almonds Are a Perfect Match
Chocolate and almonds have a natural chemistry that few other ingredients can replicate. The deep, velvety flavor of chocolate contrasts beautifully with the nutty crunch of roasted almonds. Almonds add texture, while chocolate brings a comforting sweetness that ties everything together.
The combination also satisfies different cravings at once, sweet, salty, crunchy, and creamy. It’s one of those rare pairings that can feel indulgent without being overly heavy. The roasted flavor of the almonds balances the richness of the chocolate, making each bite deeply satisfying but not cloying.
I’ve made these clusters countless times for quick snacks, edible gifts, and last-minute desserts. They work equally well for a quiet evening treat or as part of an elegant dessert spread.
The Ingredients That Matter Most
The secret to making great chocolate-covered almond clusters lies in using high-quality ingredients. Since the recipe is so simple, every component stands out.
Almonds: Choose whole, roasted almonds for the best flavor and crunch. Raw almonds work too, but roasting them intensifies their nutty taste and gives a better texture contrast against the chocolate. You can roast them yourself by spreading them on a baking sheet and baking at 350°F (175°C) for about ten minutes, stirring once midway through. Let them cool before coating.
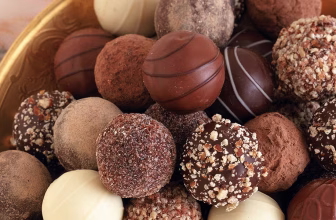
Chocolate: The type of chocolate you choose determines the overall flavor profile. Dark chocolate gives a sophisticated, slightly bitter edge, while milk chocolate offers a smoother, sweeter taste. Semi-sweet chocolate sits right in the middle and works well for most people. White chocolate also pairs nicely with almonds if you’re in the mood for something lighter.
Use chocolate bars rather than chips if possible. Bars melt more smoothly because they contain fewer stabilizers. If you do use chips, add a small amount of coconut oil or butter to help achieve a glossy finish.
Optional Ingredients: You can enhance your clusters with a pinch of sea salt, a dusting of cocoa powder, or a drizzle of white chocolate for decoration. For a flavor twist, add a hint of cinnamon, chili powder, or espresso powder to the melted chocolate.
Melting Chocolate the Right Way
Melting chocolate might sound straightforward, but doing it correctly makes a big difference in texture and appearance. The goal is smooth, shiny chocolate that coats evenly without seizing or burning.
The easiest method is the double boiler technique. Fill a pot with an inch or two of water and bring it to a gentle simmer. Place a heatproof bowl on top, making sure it doesn’t touch the water. Add your chopped chocolate to the bowl and stir occasionally as it melts. The indirect heat prevents burning and keeps the chocolate silky.
If you prefer a quicker method, use the microwave. Place the chocolate in a microwave-safe bowl and heat in 20-second intervals, stirring between each one until fully melted. Be patient, chocolate burns easily, and once scorched, it’s impossible to save.
For an extra smooth texture, stir in a small teaspoon of coconut oil or butter after melting. This gives the chocolate a glossy finish and makes coating the almonds easier.
Mixing the Almonds and Chocolate
Once the chocolate is perfectly melted, it’s time to bring it all together. Add the roasted almonds into the bowl and stir until each nut is evenly coated. The mixture should look thick and glossy, with no dry spots.
At this stage, you can decide whether to make your clusters small and bite-sized or larger and chunkier. Smaller clusters are great for snacking or gifting, while larger ones make an impressive dessert addition.
If you like, add a touch of sea salt right into the mixture to enhance the chocolate’s flavor. Salt brings out the cocoa notes and provides that irresistible sweet-salty contrast.
Shaping the Clusters
Line a baking sheet with parchment paper or a silicone mat. Using a spoon, drop small mounds of the chocolate-coated almonds onto the surface, spacing them about an inch apart. Try to make each cluster roughly uniform in size so they cool evenly.
Don’t worry if they look rustic, part of their charm is their imperfect, handmade appearance. If you want to make them look more polished, you can sprinkle a little flaky salt or chopped almonds on top before they set.
Once shaped, transfer the tray to the refrigerator for about 20 minutes or until the chocolate hardens completely. If you’re in a hurry, you can also place them in the freezer for 10 minutes, though refrigeration helps them set more evenly.
The Appeal of a 10-Minute Recipe
One of the best things about chocolate-covered almond clusters is how fast they come together. You don’t need to bake, whip, or chill anything for hours. The entire process, from melting the chocolate to cooling the clusters, can be done in under ten minutes of actual work time.
That makes them perfect for busy days when you still want to enjoy a homemade dessert. They also work beautifully as an emergency treat for unexpected guests. With ingredients you probably already have, you can create something that looks impressive without effort.
Texture and Flavor Balance
The beauty of these clusters lies in their texture contrast. The chocolate shell offers a smooth, velvety exterior that gives way to the crisp, nutty crunch of roasted almonds. Each bite feels perfectly balanced, offering richness without being overwhelming.
Dark chocolate clusters feel sophisticated and pair beautifully with coffee or red wine. Milk chocolate versions taste nostalgic and comforting, like something straight from a childhood candy tin. White chocolate clusters, on the other hand, have a creamy sweetness that complements the roasted almonds in a delicate way.
How to Make Them Look Bakery-Perfect
Presentation matters, even for simple treats. Once your clusters have hardened, you can add a few finishing touches to make them look professional.
Drizzle melted white chocolate or caramel over the tops in thin lines for contrast. Dust lightly with cocoa powder or powdered sugar for a soft, elegant look. You can also sprinkle a tiny pinch of crushed nuts or sea salt flakes on top right before serving.
If you’re gifting them, wrap a few clusters in parchment paper and tie them with a ribbon. They make beautiful, edible gifts that look as good as they taste.
Storing Your Chocolate-Covered Almond Clusters
Proper storage keeps the clusters fresh and crisp. Once completely set, place them in an airtight container, layering parchment paper between each level to prevent sticking. Store them in a cool, dry place at room temperature for up to a week.
If you live in a warm or humid environment, keep them in the refrigerator. Just let them come to room temperature before serving to regain their full flavor and texture. For longer storage, they freeze well for up to a month.
Variations to Try
This simple recipe opens the door to endless variations. Once you’ve mastered the base version, you can experiment with different nuts, flavors, and coatings.
Try swapping almonds for cashews, hazelnuts, or pecans for a different taste. Pistachios make beautiful clusters with a vibrant green contrast against the chocolate. You can even mix in dried fruit like cranberries, cherries, or raisins to add sweetness and chewiness.
For a healthier twist, use dark chocolate with a high cocoa percentage and sprinkle with unsweetened coconut flakes. If you prefer something more decadent, mix white and dark chocolate for a marbled effect.
You can also infuse your chocolate with flavors like orange zest, peppermint extract, or a touch of sea salt caramel. Each version feels unique, but they all share that same irresistible combination of crunch and melt.
Making Them for Holidays and Celebrations
Chocolate-covered almond clusters fit into almost any occasion. During the holidays, they make wonderful additions to dessert platters or cookie boxes. For Christmas, add a dusting of crushed peppermint or edible gold flakes for a festive look.
Valentine’s Day calls for heart-shaped molds and a drizzle of pink-tinted white chocolate. For Easter, mix almonds with colorful candy-coated chocolates. Even at birthdays or family gatherings, these clusters always disappear first.
They also work beautifully as party favors. Pack them into small jars or paper cups and hand them out to guests. The fact that they’re homemade gives them an extra touch of care that people genuinely appreciate.
Pairing Ideas
These clusters pair wonderfully with a range of drinks and desserts. Serve them with hot coffee, cappuccino, or espresso to complement the chocolate’s richness. They also go well with a glass of dessert wine, such as port or sherry.
For a simple yet elegant dessert platter, pair them with fresh berries, dried fruit, and a few pieces of dark chocolate bark. You can also crumble them over ice cream or yogurt for added texture and flavor.
If you enjoy baking, chop a few clusters and fold them into brownie or cookie batter for a delightful crunch surprise. They also make a great topping for mousse, cheesecake, or panna cotta.
Why Homemade Beats Store-Bought
While you can easily find chocolate-covered almonds at stores, homemade clusters taste fresher and more personal. You control the quality of chocolate, the roast level of the nuts, and the overall sweetness. Most store-bought versions use lower-quality chocolate or coat the almonds too heavily, masking their natural flavor.
Making them at home also allows for customization. You can choose the exact balance of chocolate to almonds and adjust flavors to suit your taste. Plus, they’re far more affordable than premium boxed chocolates and take only minutes to prepare.
Tips for the Perfect Batch
Even with such a simple recipe, a few small tips can make your clusters flawless. Make sure your almonds are completely cool before coating, warm nuts can cause the chocolate to seize. Always melt chocolate slowly and gently, avoiding direct heat.
If your melted chocolate thickens before you finish, rewarm it slightly in short bursts until fluid again. When spooning the clusters, don’t press them down too tightly; a looser pile gives a better texture once set.
Finally, avoid moisture at all costs. Even a drop of water can ruin the smooth texture of melted chocolate, making it grainy and dull. Use dry utensils and bowls throughout the process.
Turning Simple Into Special
Part of the charm of chocolate-covered almond clusters lies in how effortlessly they elevate any occasion. They show that you don’t need elaborate desserts or expensive ingredients to make something memorable. A few quality components, treated with care, are enough to produce a treat that feels indulgent yet approachable.
They also remind me how satisfying simple food can be. Just chocolate and almonds, but the result feels luxurious. Whether you’re making them for yourself, your family, or friends, they never fail to impress.
Final Thoughts
Chocolate-covered almond clusters in 10 minutes are proof that great desserts don’t need to be complicated. With minimal effort and only a few ingredients, you can create something rich, crunchy, and deeply satisfying. They’re fast, versatile, and endlessly customizable, perfect for last-minute cravings, gifts, or celebrations.
The combination of smooth chocolate and roasted almonds captures everything that makes homemade treats special. Each bite delivers that perfect balance of texture and flavor: sweet, nutty, and just a little addictive. Once you make them yourself, you’ll understand why this quick recipe earns a permanent spot in your dessert rotation.